THE AIRPLANE WINDOW PHOTO GUIDE
Airplane Window Photos: Tips and a 5-Shot List
Hold your lens close to the glass to cut reflections, put the wing in a corner and shoot at sunrise or sunset. Plus a five-shot travel day list and cabin portrait tips.
Try the idea on your own photo with Stunna.


Free to download. Pro options available.
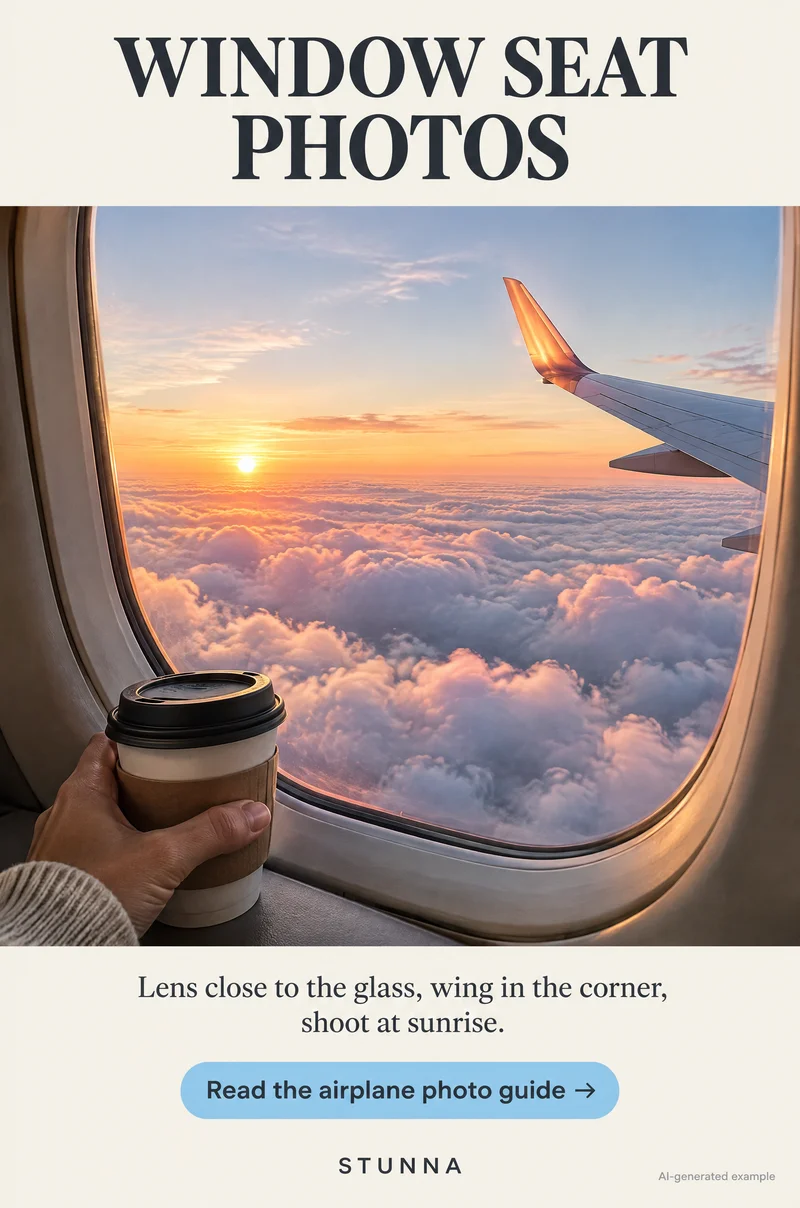
The window seat gives you a view nobody else gets: clouds below, a wing catching the light, a city appearing on landing. It also gives you scratched plastic, cabin reflections and a tiny space to work in. A few habits fix most of that, and a simple shot list turns a long travel day into a set worth posting. These are tips for your own photos; the illustrations are AI-generated examples, not actual Stunna results.
Respect the cabin first
Follow crew instructions and your airline's rules on device use at every stage of the flight, including when phones must be in flight mode or stowed and whether window shades should be open or closed. Rules vary by airline and country, and the crew's instructions always come first.
Be considerate of the people around you. Do not photograph other passengers or the crew without asking, frame portraits so strangers' faces are not recognizable, keep the flash off, and do not lean across a neighbor to reach the window. Airports often restrict photography at security checkpoints and in some other areas, so put the phone away there.
Lens close to the glass to cut reflections
Most bad window photos are ruined by reflections: the reading light, your phone, your face or a bright screen show up on the inner pane. Bring the phone's lens close to the window so very little cabin light can get between the lens and the glass. Cupping your hand or a dark sleeve around the edge of the phone blocks even more.
Do not press the lens hard against the window, especially if the plastic is scratched. Pressing can add scuffs to the window or your lens and pass on vibration from the plane. Get close, keep a small gap, and hold the phone fairly straight to the glass; shooting at a steep angle through the layered window often looks softer.
Wipe your phone lens before you start. A fingerprint smudge adds haze and glare that looks a lot like a dirty window. If one patch of the window is badly scratched or misted, move the phone to a clearer spot, often near the middle of the pane.
Put the wing in a corner
The wing tells everyone at a glance that this is a view from a plane. Place it in a corner or along one edge of the frame rather than across the middle, so it adds context without blocking the clouds or the landscape. A wing tip or engine edge in the lower corner is the classic composition.
Tap on the sky or clouds to set focus at a distance, otherwise the phone may try to focus on the window. Then check brightness: a bright sky can make the wing almost black, which can look striking, or you can nudge exposure up if you want detail. On iPhone, [Apple's camera tools guide](https://support.apple.com/guide/iphone/use-camera-tools-iph3dc593597/ios) shows the exposure control; Android camera apps usually have a similar slider, but controls vary by device.
Shoot around sunrise or sunset
Low sun at the start or end of the day gives warm color, long shadows on the clouds and a glow along the wing. Midday sun from above tends to make clouds look flat and white. If you are on an early or evening flight, check the window around takeoff and the last part of the flight; the light can change within minutes. The golden hour photo guide explains why low light flatters almost everything.
Which side of the plane gets the sun depends on your route, direction and the time of day. If the light matters to you, think about which way you are flying when you choose a seat, but do not count on it; plans change and the view is a bonus. Take several frames as the plane turns, because the light on the wing shifts.
The 5-shot travel day list
A travel day is easy to forget because it looks like waiting. Five shots turn it into a story you can open your travel photo dump with.
- 01 Boarding pass detail: a close-up of the boarding pass with a coffee, a passport cover or your hand. Hide the barcode or QR code, your name and the booking reference, since a barcode can carry booking details; crop, cover or blur them before posting.
- 02 Gate window light: big terminal windows make soft, flattering light. Stand facing the window, with a plane or the runway behind or beside you, and keep out of walkways and boarding lines.
- 03 Window seat portrait: turn your face toward the window so its light falls across your face, with the clouds or the window frame visible beside you.
- 04 Wing at sunrise: lens close to the glass, wing in a corner, warm light on the clouds.
- 05 First view on landing: when the crew allows devices, capture the first view of the city, coast or mountains as you come in, or the runway lights at dusk.
Cabin portrait in window light
The airplane window is a small, soft light source right next to your face. Turn your face toward it slightly, so light falls across your cheek and into your eyes, and let the far side of the face fall into soft shadow. Switch off the reading light above you if it puts hard shadows on your forehead or makes the colors look orange next to the cool window light. The window light photo guide covers the same idea at home.
For a self-portrait, hold the phone at eye level or slightly above, tap your face to set exposure, and frame tightly enough that the seat back and window carry the setting instead of a row of strangers. If a travel companion takes the photo from the next seat, ask them to shoot several frames while you look out of the window, then glance back. If the bright window makes your face dark, lower the shade halfway or move the phone so less window is in the frame. For more ways to photograph yourself while traveling alone, see the solo travel photo guide.
After you land: build the set
Pick one strong frame for each of the five shots and edit them with the same gentle look, so the set feels connected. Check every image for personal details before you post, including boarding passes, luggage tags, passport pages and screens.
Travel days often lead straight into the trip itself. The city break photo guide has a shot list for the first days in a new city, and the hotel room photo guide covers the window light waiting at check-in.
A few useful answers
How do I avoid reflections in airplane window photos?+
Hold your phone lens close to the glass without pressing hard, cup your hand around it to block cabin light, and switch off the reading light. Wipe your lens first.
Is it allowed to take photos on a plane?+
Rules vary by airline and country. Follow crew instructions on device use, do not photograph other passengers or crew without permission and keep the flash off.
Should I hide my boarding pass in photos?+
Yes. Hide or crop the barcode or QR code, your name and the booking reference before posting, since a barcode can carry booking details.
Where should the wing go in a window photo?+
In a corner or along one edge of the frame, so it shows you are flying without blocking the clouds or the view.
What is the best time for airplane window photos?+
Around sunrise or sunset, when low sun gives warm color and shadows on the clouds. Which side of the plane gets the light depends on your route and the time of day.