THE FOGGY DAY PHOTO GUIDE
Foggy Day Photos: 4 Tips for Misty Portraits
Fog softens everything behind you, so make the subject stand out: one strong color, stand close, expose for the face and go easy on dehaze. Plus fog at night under a streetlight.
Try the idea on your own photo with Stunna.


Free to download. Pro options available.
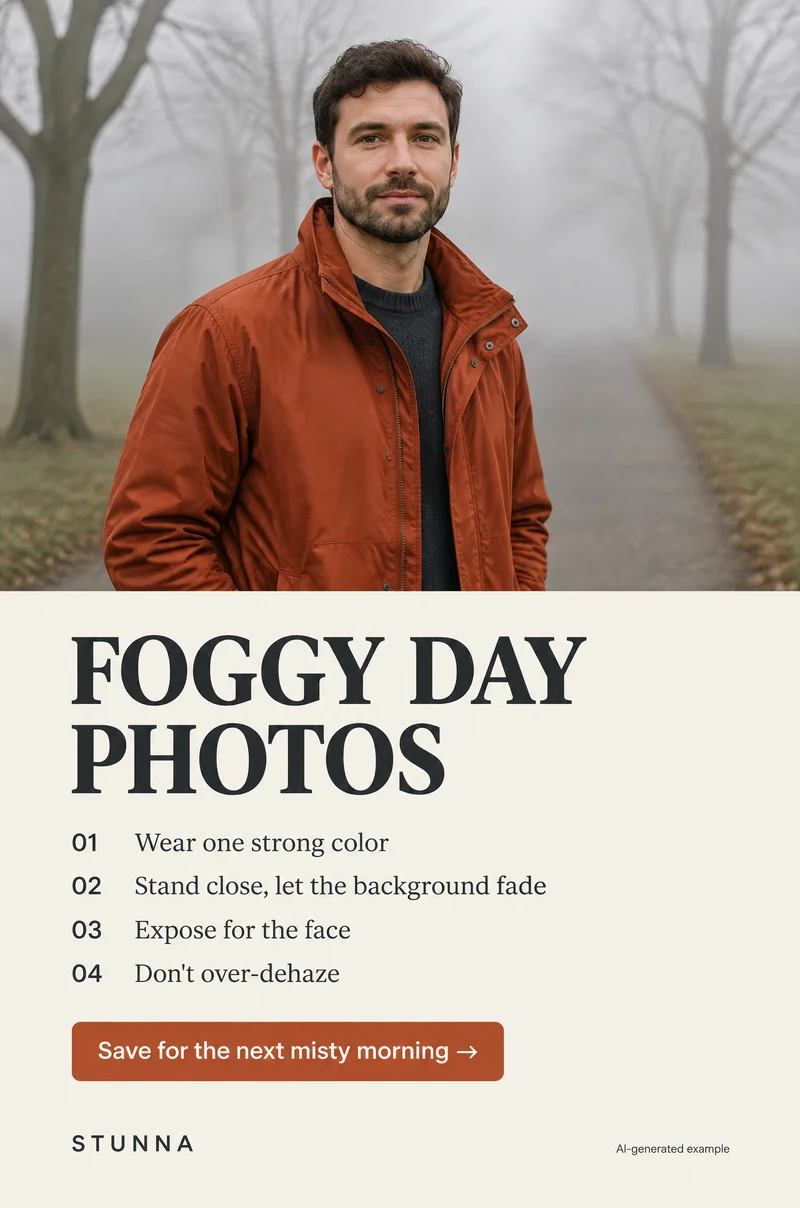
Fog is a free backdrop: it hides clutter, softens trees and buildings and makes an ordinary path feel like a film set. The catch is that it also flattens contrast, so a person can disappear into the grey along with everything else. Four small choices keep the subject clear while the background fades. These are tips for your own photos; the illustrations are AI-generated examples, not actual Stunna results.
Why fog makes photos look flat
Fog is a cloud of tiny water droplets close to the ground. They scatter light in every direction, so the further something is from the camera, the more grey veil sits between it and the lens. Distant trees turn pale, colors fade and edges go soft. That falloff is the whole appeal of a foggy photo, but it also means the light is soft and even, much like a heavy cloudy day, with few shadows to give a face shape.
Your phone sees a scene that is mostly mid-grey and tries to make it look normal. Depending on the device, that can mean a frame that looks washed out and too bright, or one where the fog turns a dull, dark grey and the face goes muddy. The fix is not a setting you find once; it is making the subject different from the fog, then telling the camera what matters.
Foggy day photos: the 4 tips
Save these four steps for the next misty morning. They work in a park, on a beach, on a city street or on a hill path.
- 01 Wear one strong color: fog mutes everything around you, so one clear color, such as rust, red, mustard, cobalt or a deep green, keeps you from blending into the grey. One color is enough; a busy pattern gets lost in soft light.
- 02 Stand close, let the background fade: the closer you are to the camera, the less fog sits between you and the lens, so you stay crisp while trees, lamp posts and buildings behind you dissolve. Put several steps of distance between you and the background and let it disappear.
- 03 Expose for the face: tap your face on the screen to set focus and exposure there, then nudge brightness up or down until skin looks natural. Judge the face first and let the fog land where it lands.
- 04 Don't over-dehaze: a dehaze or clarity slider can bring back some contrast, but pushed hard it turns soft mist into a gritty, dirty-looking haze with halos around the person. Use a light touch or leave it off.
Wear one strong color
Think of the fog as a soft grey-white wall. Anything muted, like a beige coat, a grey hoodie or pale denim, sits close to that tone and reads as part of the background. A saturated color gives the eye an instant place to land, even at phone-thumbnail size. Warm colors such as rust, orange, red and mustard stand out especially well against cool fog, but any color you like wearing works if it is clearly stronger than the scene.
Keep it to one strong piece: a jacket, a scarf, a hat or an umbrella. Dark clothes can work too, because they make a crisp silhouette against pale mist, but a dark outfit gives you less to play with when the light is flat. If you already shoot in the cold, the winter coat photo poses translate directly to a foggy walk.
Stand close and let the background fade
Distance is your contrast control in fog. A person a few steps from the camera keeps their color and detail; a tree twenty steps further back becomes a soft shape. Ask the photographer to stay fairly close and frame from the waist or knees up, then place the background far behind you rather than standing right against a wall or hedge.
Look for layers: a path that leads into the mist, a row of trees that fade one after another, or a lamp post that is half visible. These give the photo depth without adding clutter. Leave some empty grey around the person, especially above the head; in fog, negative space looks intentional rather than empty.
Use the main camera rather than the ultra-wide. The wide lens pushes the background further away and stretches the edges, and in fog that often leaves a tiny person in a big grey frame.
Expose for the face, not the fog
Tap on the face to set focus and exposure there. On iPhone you can then drag the exposure control up or down, as shown in [Apple's camera tools guide](https://support.apple.com/guide/iphone/use-camera-tools-iph3dc593597/ios). Android camera apps usually offer a similar brightness slider after you tap, but names and placement vary by device, so check your own camera app before you head out.
If the frame looks bright and washed out, bring exposure down slightly until the fog has some tone and the face still looks healthy. If the face looks dark and the fog looks dull, nudge it up. Take a few frames at slightly different brightness; it is much easier to choose the right one later than to rescue a wrong one in the editor.
Fog often brings cold, damp air. Wipe the lens before each set, because condensation and fingerprints add a second, uglier haze on top of the real one. If you walk from a warm car or café into the cold, give the phone a minute before shooting so the lens can clear.
Don't over-dehaze in the edit
Editors call it different things: dehaze, clarity, structure or contrast. These sliders are tempting on a foggy photo because the first thing you notice is that it looks soft. Pushed too far, they make the fog look like pollution, add bright halos around the outline of the person, exaggerate noise and make skin look rough.
Edit in this order instead: crop, set overall brightness, then add a small amount of contrast or dehaze while watching the edges of the face and hair. Stop as soon as the person looks clear; the background is supposed to stay soft. If you want a stronger mood, a gentle cool or warm tint usually works better than more clarity. Fog photos also convert well to black and white, which hides any color cast and leaves only the layers.
Fog at night: stand under a streetlight
On a foggy evening, a single streetlight turns into a soft glowing backdrop, because the droplets around the lamp catch its light. Stand just under or slightly beside the lamp so it lights your face from above and in front, with the fog and darker street behind you. Turning your face a little toward the lamp brings light into the eyes.
Set exposure on your face, not on the lamp. If you tap the bright light, the phone darkens the whole frame and you become a silhouette. Tap your face, then lower brightness slightly if the lamp turns into a large white blob. Night modes on many phones take a longer capture, so stay still and brace the phone on a railing or a wall; the result may be cleaner than a handheld snap.
Shoot early in the evening, when there is still a little blue in the sky, for more color, and see the blue hour photo guide and the rainy night photo guide for wet-street reflections. Fog reduces visibility for drivers too, so stay on the pavement, keep away from traffic and wear something visible near roads.
Plan around the forecast
Fog is often thickest early in the morning and can burn off quickly as the sun warms the air, so have your outfit and location chosen the night before. Weather apps sometimes list fog or low visibility in the hourly forecast; parks near water, river paths and hillsides are common places to find it, but every area is different.
Shoot a short set rather than one perfect frame: a close portrait, a walking shot into the mist, and a wider frame where you are small against the fading layers. If the sun breaks through, the light can turn hazy and glowing for a few minutes, which suits a backlit portrait. Snowy mornings share many of the same exposure problems; the snow day photo guide covers those.
A few useful answers
What should I wear for foggy photos?+
One strong color that stands out against grey, such as rust, red, mustard or cobalt. Muted beige and grey tend to blend into the fog.
Why do my fog photos look washed out?+
Fog is mostly mid-grey, so the phone may brighten the frame and lose contrast. Tap your face to set exposure, lower brightness slightly if needed and stand closer to the camera.
Should I use dehaze on foggy photos?+
Only a little. Heavy dehaze or clarity makes mist look gritty and adds halos around people. Keep the subject clear and let the background stay soft.
How do I take photos in fog at night?+
Stand just under or beside a streetlight so it lights your face, keep the fog behind you and set exposure on your face rather than the lamp. Hold the phone steady if night mode turns on.
When is the best time for foggy photos?+
Fog is often thickest early in the morning and can clear quickly, so check the hourly forecast and be ready to go out early. Conditions vary a lot by place.