THE SQUINT FIX GUIDE
How to Stop Squinting in Photos: 4 Easy Fixes
Squinting in sunny photos usually comes from facing the sun. Put it behind your shoulder, find open shade, open your eyes on three or use a hat brim. Plus gentle rescue edits.
Try the idea on your own photo with Stunna.


Free to download. Pro options available.
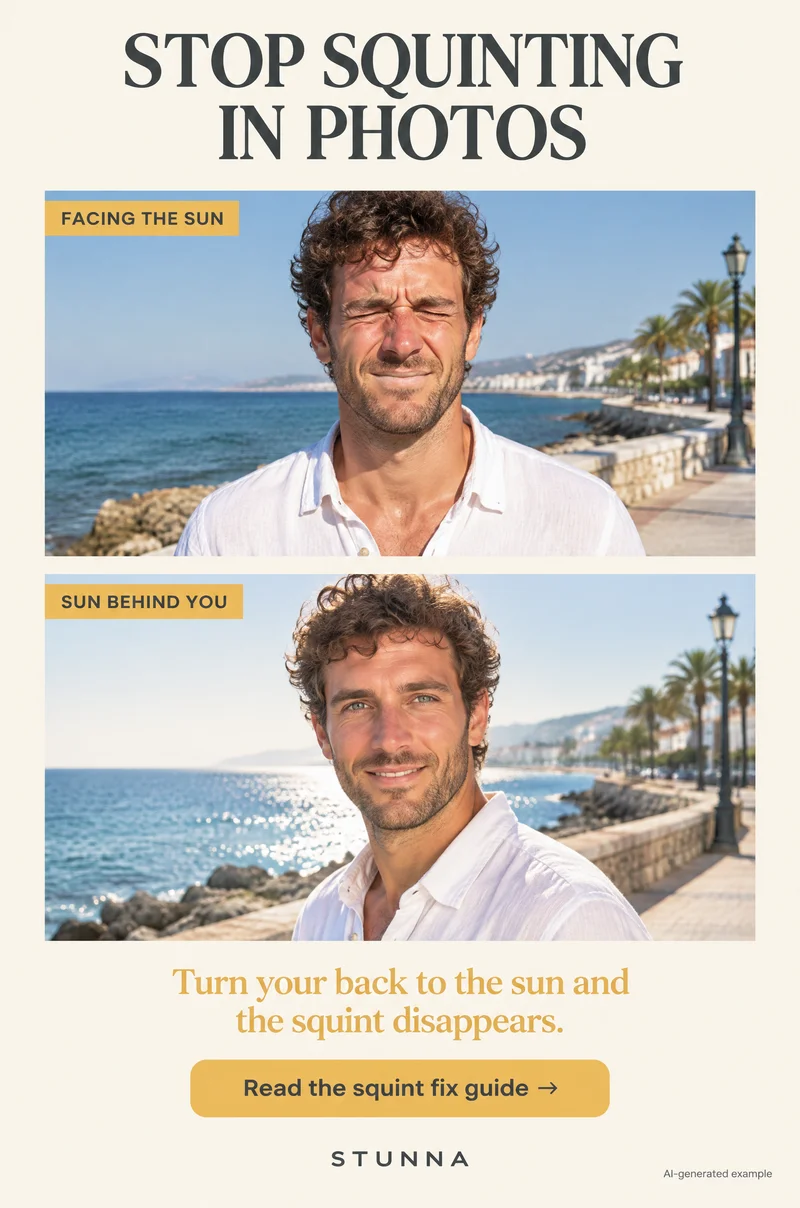
The sunny day you wanted to remember often turns into a camera roll of narrowed eyes, tense foreheads and smiles that look more like grimaces. Squinting is a normal reaction to bright light, not a posing failure, and a few changes to where you stand fix most of it. These are tips for your own photos; the illustrations, including the before-and-after comparison, are AI-generated examples, not actual Stunna results.
Why you squint when you face the sun
When bright light hits your eyes, you narrow them to let less in. It happens automatically, and it is hard to override by willpower, especially when the photographer asks you to hold still and the light keeps coming. Facing the sun is the worst case: the light falls straight into your eyes, and anything bright in front of you, like pale sand, water, snow or a white wall, bounces more light up into your face.
The common advice to stand with the sun on your face comes from older cameras that needed a lot of light. Modern phones handle shade and backlight much better, so you rarely have to face the sun at all. Never look directly at the sun to 'get used to it'; it does not help the photo and can hurt your eyes.
4 ways to stop squinting
Save these four fixes before your next beach day. Try them in order; the first one solves most squints on its own.
- 01 Sun behind your shoulder: turn so the sun sits behind you and slightly to one side. Your face is lit by the softer light of the sky in front of you, your eyes relax, and your hair often picks up a bright rim.
- 02 Step into open shade: move into the shadow of a building, a tree or an archway where you can still see open sky in front of you. The light on your face is even and gentle, without hard shadows under the eyes.
- 03 Eyes closed, open on 3: close your eyes for a few seconds while the photographer counts down, open them on three and shoot straight away. Your eyes get a short rest before the light hits them again.
- 04 Use a hat brim: a cap or a wide-brimmed hat shades your eyes so you can keep them open. Tilt your chin up slightly and set exposure on your face so the shadow under the brim does not turn dark.
Put the sun behind your shoulder
Turn until the sun is behind you and a little to one side, roughly over one shoulder. The photographer may need to move too, so the sun is not shining straight into their lens. Your face is now lit by the sky and the ground in front of you, which is much softer than direct sun, and the edges of your hair and shoulders glow.
Your phone may darken the face because the background is brighter. Tap your face to set focus and exposure, then raise brightness slightly if needed. On iPhone the exposure control appears next to the focus box, as shown in [Apple's camera tools guide](https://support.apple.com/guide/iphone/use-camera-tools-iph3dc593597/ios); Android camera apps usually have a similar slider, but controls vary by device. The backlit portrait guide covers this light in more detail, including how to handle lens flare.
Find open shade
Open shade means you are in the shadow but facing a wide, bright patch of sky or a light-colored street. It is the most reliable fix for midday photos, when the sun is high and creates dark eye sockets as well as squints. Stand just inside the edge of the shade, not deep under a dark tree, so your face still gets plenty of light.
Check for dappled light, where small bright spots fall through leaves onto the face; one spot on a cheek or eye is distracting. The harsh sun photo guide has more ways to deal with strong midday light, and on very bright days a car parked in open shade works too, as the car photo poses guide explains.
Eyes closed, open on three, and the hat brim
When you cannot move, give your eyes a break. Close them, relax your forehead and breathe out. The photographer counts 'one, two, three', you open your eyes on three and they shoot several frames straight away. The first second after opening is usually the most relaxed. Repeat as often as you like; it also helps with blinks, which the blink photo guide covers.
Another trick is to look down at the ground, then lift your eyes to the lens on the count. Looking at the darker ground for a moment is gentler than staring into a bright scene while you wait.
A hat brim is your portable shade. It works best when the sun is high. The trade-off is a shadow across the eyes, so tilt your chin up a little toward open sky and expose for your face. Sunglasses are the simplest fix of all; if you wear them, check the lenses for reflections, as the glasses photo guide explains.
Rescue a squinty photo gently
First, check whether you need a rescue at all. If you took a burst or several frames, one of them may have more open eyes. A slight, happy squint while laughing often looks natural and warm; it is the tense, pained squint that usually bothers people.
If you love the frame, keep edits small. Crop so the face is a little larger, lift shadows around the eyes slightly and lower highlights on a bright forehead or cheek. Avoid sharpening the eyes heavily, which makes squint lines more obvious. Keep skin texture; the natural skin photo edit guide explains how to avoid an over-smoothed look.
AI edits that open or relax eyes can help, but they can also change eye shape, gaze direction or the expression itself, which may make the person look like someone else. Always keep the original, compare the edit at full size and ask the person in the photo whether it still looks like them. If it does not, keep the original or reshoot.
Common mistakes
These are the most frequent reasons sunny photos end up squinty.
- Facing the sun because you want light on your face: the sky already lights your face. Turn around.
- Holding the pose too long: eyes tire and narrow. Shoot quickly, then reset.
- Standing on bright sand, snow or pale stone at midday: the ground reflects light into the eyes. Move to shade or turn so it is behind you.
- Exposing for the bright sky: the face goes dark when the sun is behind you. Tap the face to set exposure.
- Over-editing the eyes: heavy sharpening or strong AI changes can make a face look unfamiliar. Edit lightly and compare.
A few useful answers
Why do I squint in every sunny photo?+
Bright light makes your eyes narrow automatically. Facing the sun, or standing on bright sand, water or snow, sends the most light into your eyes.
Where should the sun be when taking a photo?+
Behind you and slightly to one side, roughly over one shoulder. Tap your face to set exposure so it does not turn dark against the bright background.
How do I stop squinting without moving?+
Close your eyes for a few seconds and open them on the count of three while the photographer shoots straight away. A hat brim or sunglasses also help.
Can you fix squinting in a photo after it is taken?+
Sometimes. Choose another frame first, then try small edits to shadows and highlights. AI eye edits can help but may change eye shape or expression, so compare with the original.
Is open shade better than direct sun for photos?+
Usually, yes. Open shade gives even, soft light on the face with no squinting, as long as you stand near the edge facing open sky.