KEEP YOUR TEXTURE
Natural Skin Photo Edits: Texture and Identity Checks
Use four natural-skin checks and a full preservation prompt to review photo edits without losing your real skin tone, texture or face shape.
Try the idea on your own photo with Stunna.


Free to download. Pro options available.
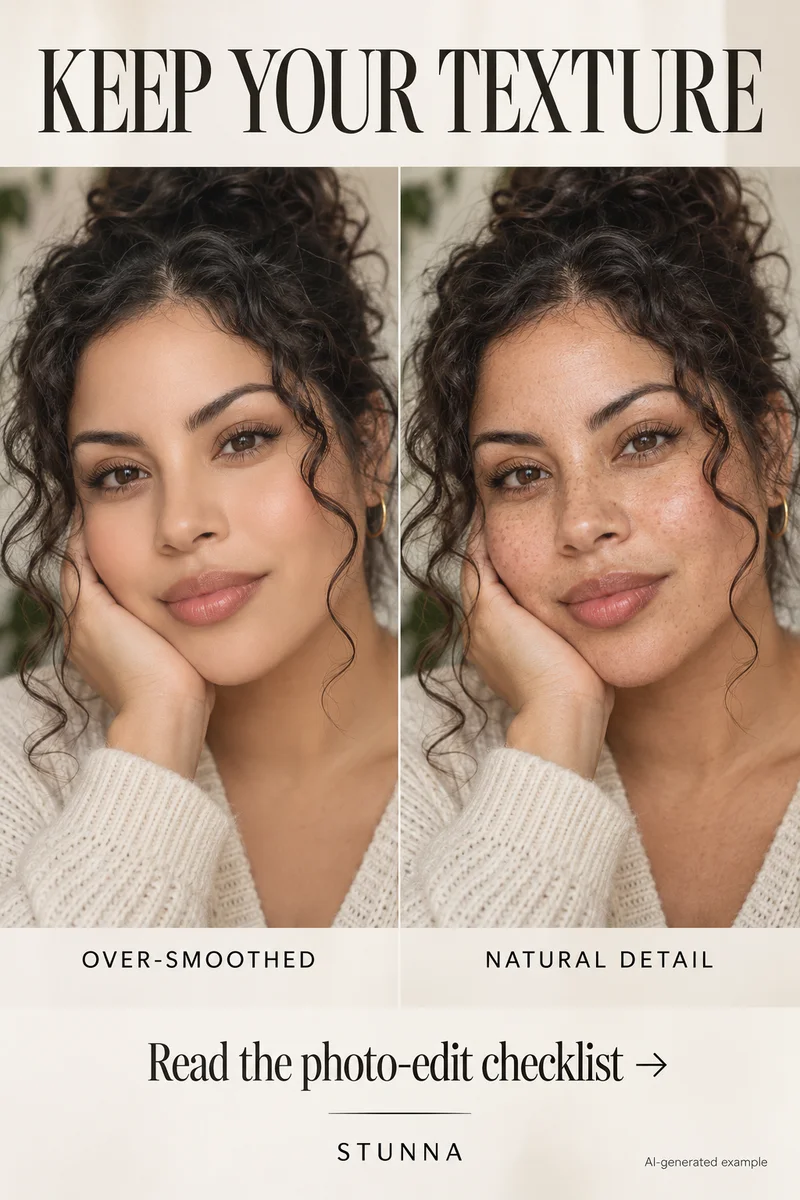
An edit can calm distracting shine or a color cast while leaving you recognizable. Skin does not need to become flat for a portrait to feel finished. Choose one change, keep the source nearby and use the four checks below. There is also a full prompt to copy. The comparison is an AI-generated illustration, not a real person's before-and-after or an actual Stunna result.
Name the small change you actually want
Separate a photo issue from your appearance. A forehead reflection, green cast and temporary mark are different requests. Choose the one that distracts you. Freckles, pores, scars and lines can stay; they are not automatic retouching instructions. Keeping the original is a complete editing decision.
Write a specific target, such as 'reduce forehead shine while keeping the light direction.' A vague request for perfect skin gives little guidance about what to preserve. Choose readable facial detail rather than asking an AI edit to reconstruct a blurred face.
Make lighting and color decisions before smoothing
Compare the face with the neck, ears and hands. Preserve the room's warmth while correcting an unwanted cast gently. A brighter face is not automatically more accurate, and darker skin should not be lightened to fit a preset mood.
Use small local changes in a manual editor. [Adobe's masking documentation](https://helpx.adobe.com/lightroom/desktop/edit-photos/masking.html) describes Texture as a control for smoothing or emphasizing detail, separate from color and tonality. Decide whether the issue is brightness, color or detail before smoothing. Available controls depend on your editor.
The natural-skin check: four things to keep
Compare the source and edit at the same crop and scale. Review the overall feel, then zoom into the cheeks, forehead and eyes. These four checks match the Pin.
- Keep your real skin tone. Compare the face, neck and hands; look for unexplained lightening, darkening or changes to the undertone.
- Look for natural texture. Keep visible detail that exists in the source, including freckles and fine lines; watch for waxy patches or invented pore patterns.
- Keep your face shape. Check jaw, nose, eyes, lips and expression against the original rather than accepting an automatic redesign.
- Compare with the source. Switch between the original and edit at the same size; the one requested change should be easy to describe.
Copy this preservation-first editing prompt
Use a photo you have permission to edit and replace the bracketed change with your chosen issue. Preservation instructions describe intent; they do not guarantee unchanged details. Review the result with the checklist.
If the first edit goes too far, return to the source
A plausible face can still belong to a slightly different person. If a feature drifts, compare with the source and request that specific restoration. When several details change, restart from the original with a narrower request instead of stacking corrections.
For a manual edit, reduce the adjustment or disable the mask. Compare a version with improved light and untouched texture against the retouched one. This reveals when smoothing does more than you wanted.
Review the exported portrait, then choose your finish
Inspect the saved image at full and intended viewing size. Watch for bright facial outlines, inconsistent neck color and soft patches beside sharp hair. Keep the source separately so later edits do not replace your reference.
Treat any new mood as a separate choice. Our AI photo editing checklist covers hands and background details. A finished portrait can still have texture, shine and shadows; choose the version that represents the moment.
The free white photo border tool offers another finishing option. Frame the portrait you have already reviewed; this tool adds a border rather than retouching skin.
Plan the next frame
To balance a bright background with a readable face, use the guide to backlit portrait tips. To give your hands a natural job in a quiet setting, use the guide to bookstore photo poses. To keep dark fabric and layers readable, use the guide to all-black outfit photos. To check texture at full size and feed size, use the guide to film-grain photo editing.
To ease into a relaxed gaze toward the lens, use the guide to looking at the camera naturally. To balance a portrait against a bright snowy background, use the guide to snow-day photo tips. To request a specific background change and inspect what stays, use the guide to ChatGPT background-edit prompts. To soften color without washing out the person, use the guide to pastel photo editing.
A few useful answers
Does natural skin mean avoiding every edit?+
No. It means deciding what you want to change and checking what stays. You can adjust a distracting reflection or cast while keeping your identity, original skin tone and visible texture.
Can a prompt guarantee the same face and skin texture?+
No. Preservation instructions help communicate the request, but a generated edit can still change features or invent detail. Compare every result with the source and keep only a version you recognize.
What if the original photo has very little skin detail?+
Avoid asking an AI tool to present invented texture as recovered detail. Use a clearer source when you have one, make a smaller edit, or keep the original softness.