THE GLASSES PHOTO GUIDE
Glasses Glare in Photos: How to Reduce Reflections
Try three practical fixes for lens reflections, keep the eyes readable, and review a modest edit before saving.
Try the idea on your own photo with Stunna.


Free to download. Pro options available.
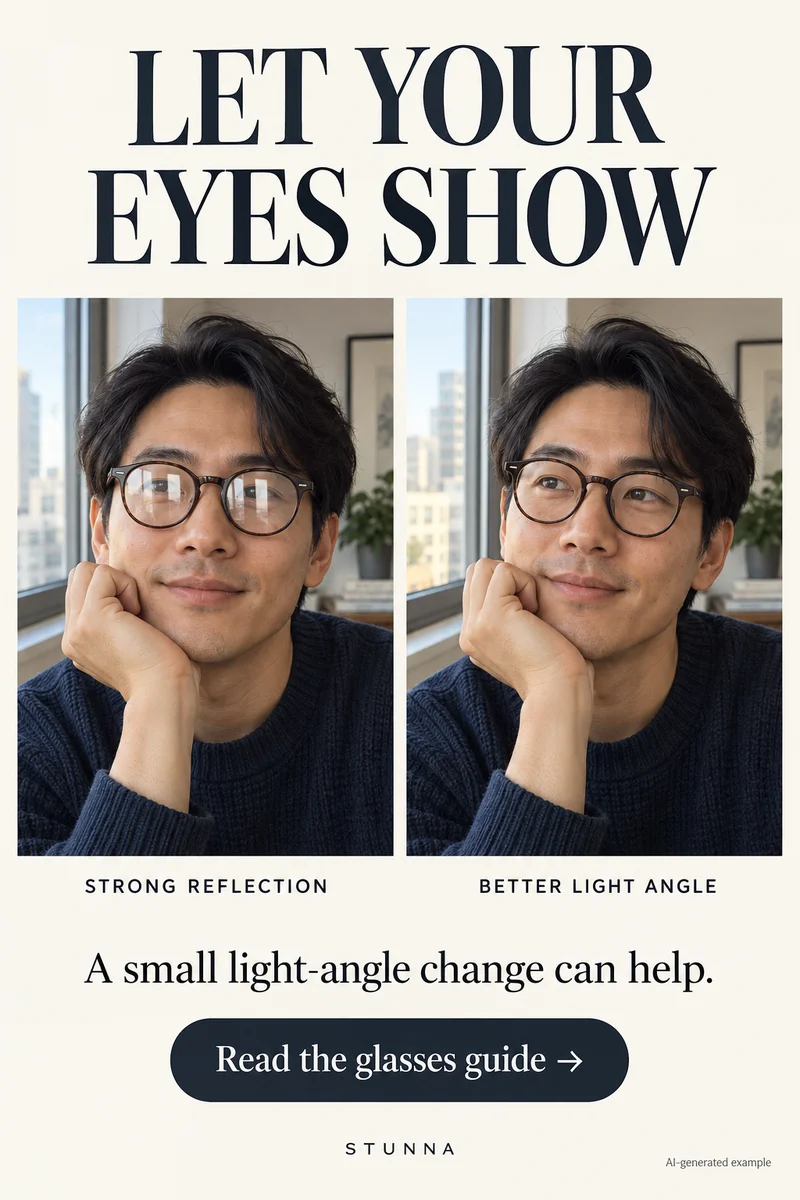
Glasses are part of the portrait. You can often keep them on and reduce distracting reflections by changing the relationship between the light, lenses, and camera. Start with small movements and check the eyes in each test frame. You do not need to eliminate every reflection; you need a picture where the expression reads clearly. AI-generated visual examples illustrate the look; they are not measured Stunna outputs.
Find the reflection before changing the photograph
Look at the phone preview and identify the bright shape in the lenses. It may be a window, lamp, screen, or flash. Turn one competing light off for a test if you control the room. With daylight, move around the window rather than assuming the brightest position is best. Our window light photography guide covers more positions.
Check both lenses. A position that clears one eye may reflect light across the other. Keep the person comfortable and make one change at a time so you can see what helped. Outdoors, the same small turns apply, and our guide to photos in harsh sunlight covers working with direct sun. Clean the camera lens and glasses gently with suitable materials before deciding whether haze needs an edit.
Try these three fixes for glasses glare
Use the test picture as your guide instead of relying on one fixed angle.
- Move the light: if you control a lamp, try it farther to one side and retest. For a window, move the person and camera relative to it. Keep enough useful light on the face.
- Turn slightly: make a small, comfortable turn of the head or a small change in camera position. Watch whether the reflection moves away from the eyes. Avoid a pose that only works by straining the neck.
- Check the eyes: take a frame and zoom in on both eyes. Confirm that the gaze is readable and the face remains well lit. Repeat a small adjustment if one reflection still hides the expression.
Capture a short comparison sequence
Start with a still portrait in the original position. Then take a frame after moving the light or your position, followed by a small head turn. Keep framing and distance similar so you can compare the changes clearly.
Once you find a useful setup, make a look at the camera, a look just beside it, and a wider picture. Hold still briefly for each. If you test flash, keep that as a separate option: light near the camera may produce a different reflection from the window setup. Check the result before taking several more frames.
Choose a modest edit when the source is worth keeping
A small reflection away from the eyes may not need removal. In a conventional editor, a local adjustment can soften a bright patch if the original detail is visible underneath. Avoid darkening the whole lens until it looks like sunglasses or blurring the surrounding eye. If you use a prompt-based editor instead, our ChatGPT photo editing prompts offer starting briefs.
Stunna’s Glare Gone is designed to clear glasses glare while keeping eyes natural. Treat that as an intended creative direction rather than guaranteed recovery of hidden detail. If a reflection completely covers an eye, an AI edit may generate information instead of revealing exactly what the camera captured. Choose a clearer original when you have one.
Review eyes, frames, and reflections together
Compare the result with the original at the same crop. Inspect eye shape, gaze, eyebrows, eyelashes, and the outline of the glasses. Check that lens edges, arms, and reflections still fit the angle of the face. A clearer lens is not an improvement if the person’s expression changes. Our AI photo editing checklist covers the rest of the review.
Zoom back out to check the whole portrait. Some gentle reflection can make glasses feel like part of a real setting. If the background distracts more than the lenses, see our guide to a clean photo background. Keep the version that makes the person readable while preserving the details you care about, and save the original separately.
A few useful answers
Do I have to remove my glasses?+
No. Try changing the light angle and making a small comfortable turn first. Keep the glasses when they belong to the portrait you want.
Should I erase every lens reflection?+
Only when it improves the picture. A small reflection can be natural; the main check is whether both eyes and the expression remain readable.
Can Glare Gone restore the exact eye hidden by glare?+
That is not guaranteed. A generated edit may create plausible detail. Compare identity and gaze carefully, and use a clearer original when possible.