THE MYSPACE PHOTO GUIDE
MySpace Flash Selfie: 2007 Photo Look in 5 Steps
The 2007 MySpace selfie is back: camera above your head, chin down, eyes up, hard flash in a dark room, then high contrast and a little noise. Five steps, four shot ideas, the edit order and how to keep it from looking like a costume.
Try the idea on your own photo with Stunna.


Free to download. Pro options available.
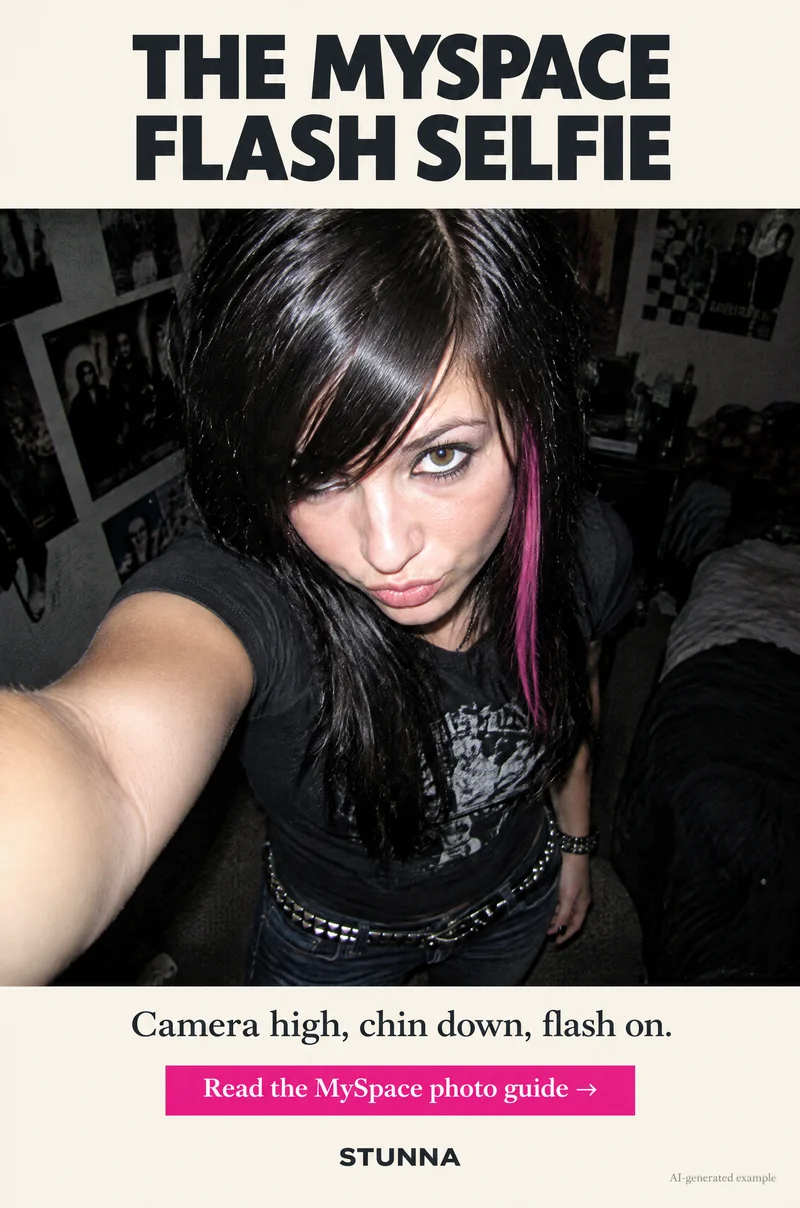
Around 2007, profile pictures had a look you could spot from across the room: the camera held high above the head, chin tucked down, eyes looking up through a side fringe, and a hard flash bouncing off a face in a dark bedroom. The colors were punchy, the shadows went black and the files were a little noisy. That look is having a moment again, and you can recreate it with a phone in a few minutes. Below are the five steps, four MySpace-era shot ideas, the edit order and a few ways to keep it feeling like you rather than fancy dress. The illustrations are AI-generated examples, not actual Stunna results.
What made the MySpace look
The MySpace era photo came from the cameras people had at the time: small point-and-shoots, early camera phones and laptop webcams. Their sensors were tiny, so in a dim room the flash did almost all the work. It lit the face brightly and flatly, the room behind fell into darkness, and the files picked up digital noise in the shadows. Nobody was trying to make that look. It was simply what happened at night.
The pose mattered just as much. Holding the camera above your head and looking up into it became the signature profile-picture angle. It made eyes look bigger, showed off hair and bangs, and fit the square-ish crops of the time. Add side-swept fringes, a bit of eyeliner, band tees and a friend squeezed into the frame, and you have the feel. The goal today is to borrow that mix of angle, flash and contrast, not to rebuild a whole 2007 bedroom.
The MySpace photo look: 5 steps
Save these five steps. The first three happen when you take the photo; the last two happen in your editing app.
- 01 Camera above your head: hold the phone at arm's length, a little above your eye line and slightly in front of you, tilted down toward your face.
- 02 Chin down, eyes up: tuck your chin a little and look up into the lens. Small moves work best; a deep tuck looks forced.
- 03 Flash on in a dark room: switch off the main light, set the flash to on rather than auto, and let one small lamp or string lights glow in the background.
- 04 Push the contrast: raise contrast and pull the blacks down until the shadows turn solid black and the flash-lit face pops.
- 05 Add a little noise: finish with a small amount of grain or noise, enough to feel like an old digital file, not enough to hide your face.
The high angle: camera up, chin down, eyes up
Start with your arm straight up and slightly forward, so the phone sits about a hand's width above your head and tips down toward you. If the camera is directly overhead you get the top of your head and not much else; if it is only at eye level you lose the angle completely. Move it until your face fills roughly the top half of the frame and your shoulders drop away below.
Then tuck the chin a little and lift your eyes to the lens. Think of looking up from under your fringe, not of pressing your chin into your chest. Tilt your head a few degrees to one side, which was a big part of the original pose, and let your free hand do something: a peace sign near the cheek, a hand in your hair or holding the collar of your top. Take a burst and pick the frame where your eyes are fully open and looking into the lens.
Phone cameras today are wide, so holding the phone very close can stretch your forehead or nose. If it looks distorted, straighten your arm further, or switch to the rear camera and use the self-timer. The rear camera usually has the stronger real flash, which is closer to the original look than the front camera's screen flash. Our phone camera angle guide covers how high and low angles change a face if you want to fine-tune it.
Flash on in a dark room
The flash is what separates a MySpace photo from a modern selfie. Night mode tries to brighten the whole room evenly, so everything looks soft and grey. A hard flash in a dark room does the opposite: it lights your face, catches the shine on your skin and lets the background go almost black. That contrast is the whole mood.
Turn the main light off and keep one small light source behind you, like a desk lamp, fairy lights or a screen glow, so the room is not a total void. Set the flash to on, not auto, so it fires every time, and turn night mode off if your phone offers it. Keep the phone about an arm's length away. Much closer and the flash can blow out your forehead and nose; much further and your face starts to fall into the dark.
A little red-eye or shine is part of the charm, but you can reduce it by looking slightly past the lens or turning on a dim lamp nearby so your pupils shrink. For a cleaner, more modern flash look from roughly the same era, compare our digicam photo guide, which leans into the crisp compact-camera style of the early 2000s.
4 MySpace-era photo ideas to recreate
These four shots make a full set. Take them in one evening with the same outfit and flash setup so they match when you edit.
- 1 High angle: the classic profile picture. Camera above your head, chin down, eyes up, flash on, head tilted. Keep your fringe or a strand of hair falling across one side of the face.
- 2 Mirror flash: stand in front of a bedroom or bathroom mirror with the flash on and hold the phone up near your face, so it partly covers one side. Angle your body a little so the flash bounce does not land right on your face. Our mirror selfie guide explains where to stand to keep the reflection clean.
- 3 Webcam pose: sit at a desk with the laptop or phone propped at eye level, lean in close, one hand on your cheek or chin, and look slightly up into the camera. Use the front camera with the room dim and a screen or lamp lighting your face. A soft, grainy result suits this one.
- 4 Peace-sign duo: squeeze in cheek to cheek with a friend, camera high, both chins down, one peace sign each. Keep both faces at the same distance from the flash so one person is not brighter than the other, and take a burst so you get a frame where you both have your eyes open.
The edit order: contrast, blacks, then noise
Edit in this order. Adding noise before you fix exposure makes the grain clump in the wrong places, and pushing contrast last can turn the grain harsh. Slider names and ranges vary between apps, so treat these as starting points and judge by eye.
- 1 Crop: try a square or 4:5 crop with your face near the top third. A slightly tilted horizon is fine for this look.
- 2 Exposure: set brightness so your face is bright but your forehead and nose still have some detail.
- 3 Contrast: raise it until the face pops off the background. This is the biggest single step toward the look.
- 4 Crush the blacks: lower the blacks or shadows, or pull the bottom-left point of the curve down, until the dark room turns solid black.
- 5 Color: add a little saturation or vibrance, especially to pinks, reds and blues, and keep skin tones believable.
- 6 Sharpen lightly: a small bump in sharpness or clarity adds the crisp digital edge. Stop before skin looks crunchy.
- 7 Noise last: add a small amount of grain. Zoom to 100 percent and check that eyes and lips are still clear.
Keep it from looking like a costume
The look falls apart when every era detail is piled into one frame: heavy eyeliner, a neon streak, a studded belt, a band tee, a peace sign and a glitter filter all at once. Pick one or two cues and let the angle, flash and contrast do the rest. Your own hair with a side part and the flash pose usually reads as 2007 without anything else.
Wear clothes you would actually wear now, and keep your face recognisably yours. Push contrast and noise until the photo feels old, then pull back a step. If skin turns grey or blotchy, lower the noise and the clarity before anything else. For a warmer, softer throwback from a few years later, our 2016 Tumblr photo aesthetic guide is the natural next look to compare.
- Too much noise: the grain should feel like texture, not like a dirty lens.
- Flash too close: a blown-out white forehead hides your face. Straighten your arm.
- Bright room: with the ceiling light on, the flash cannot create the dark background.
- Extreme chin tuck: a little tilt reads as the pose; a lot reads as a double chin.
- Filters on top of filters: do the edit once, in order, and stop.
A few useful answers
What is the MySpace photo aesthetic?+
A 2007-era selfie look: the camera held above your head, chin down and eyes up, hard flash in a dark room, high contrast with black shadows and a little digital noise.
How do I take a MySpace angle selfie?+
Hold the phone at arm's length slightly above your head, tilt it down toward you, tuck your chin a little and look up into the lens. Tilt your head to one side and take a burst.
Should I use the front or rear camera?+
The rear camera usually has a stronger real flash and less distortion, so use it with the self-timer or a mirror. The front camera works well for the softer webcam pose.
How do I edit a photo to look like 2007?+
Crop, set exposure, push contrast, crush the blacks, add a little saturation, sharpen lightly and add a small amount of noise last. Treat slider amounts as starting points.
How do I keep the MySpace look from looking like a costume?+
Use one or two era details at most, wear clothes you actually wear now and let the angle, flash and contrast carry the look. Pull the edit back a step once it feels old.