THE DINNER PARTY PHOTO GUIDE
Dinner Party Photos: Warm Light, Not Yellow
Keep candles low and faces lit, turn off the big light, shoot from the end of the table and tidy up before the group photo.
Try the idea on your own photo with Stunna.


Free to download. Pro options available.
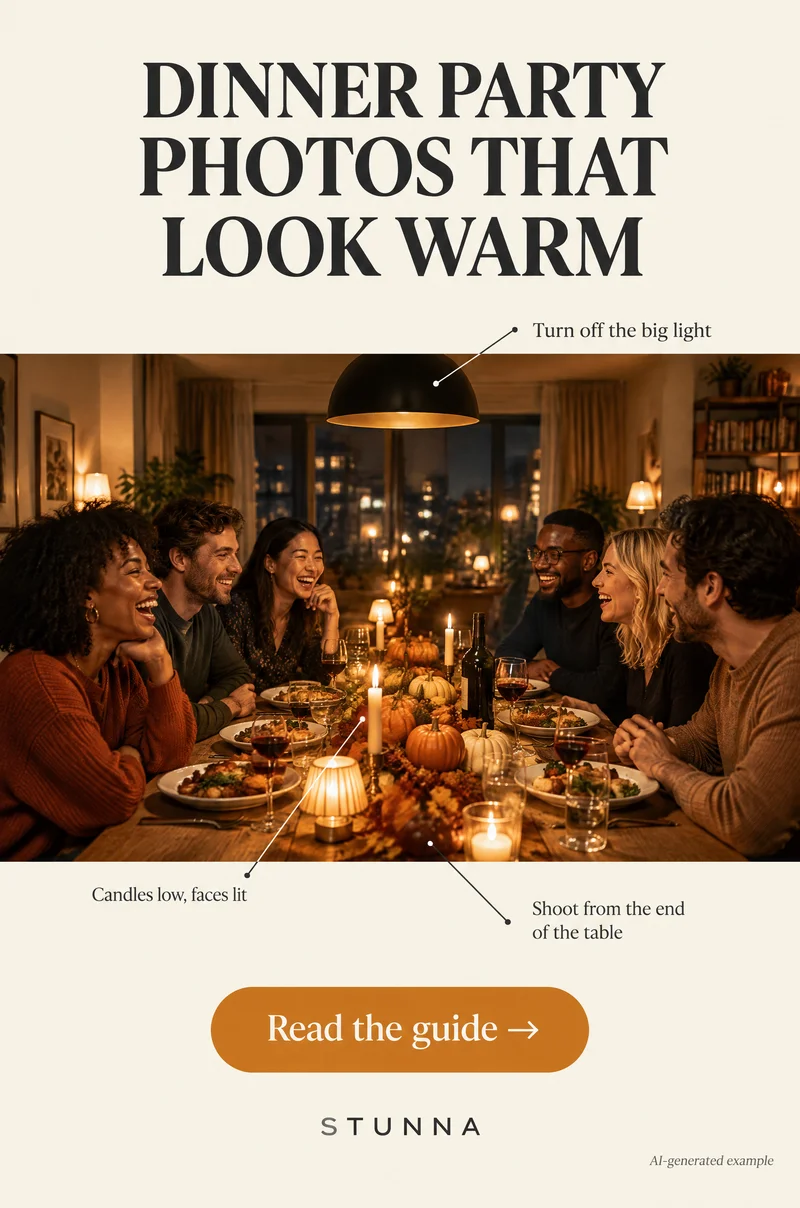
Dinner parties, Friendsgiving and holiday meals are some of the best photos of the year, and some of the most disappointing: everyone looks orange, the table is chaos and someone is mid-chew. A few small choices fix most of it. Keep candles low and faces lit, turn off the big light, and shoot from the end of the table. The images on this page are AI-generated examples, not actual Stunna results.
Why dinner photos turn yellow, and what to change first
Most dining rooms mix warm bulbs, a bright ceiling light and sometimes a cool kitchen glow. The phone tries to average them and skin ends up yellow or patchy. Turn off the big overhead light first. It flattens faces, creates shadows under the eyes and fights with candlelight.
Keep a couple of softer sources instead: a lamp on a side table, candles on the table and perhaps a strip of fairy lights. Our string light photo guide covers using small lights for depth. If someone has installed colored smart bulbs, set them to a warm white for photos; the red light photo guide explains why strongly colored light is hard on skin.
Candles low, faces lit, and kept safe
Candles placed low on the table light faces from below and in front, which feels warm and flattering. Group several short candles rather than one tall one, and keep them between people rather than directly under a face. A lamp or window behind the camera can add a little extra light to the eyes.
Keep candles in stable holders, away from napkins, place cards, sleeves, hair and greenery, and never leave them burning in an empty room. Move them before anyone leans across to pass dishes, and put them out properly at the end of the night.
Shoot from the end of the table
Standing at the head or foot of the table lets you see both rows of faces and the length of the meal, which instantly reads as a gathering. Hold the phone at seated eye level or slightly above, not high overhead, so faces stay in view. For a wider frame, step back and let the table lead into the picture.
For the main group photo, our group photo guide has setup checks that work around a table. When guests arrive, a few frames of people walking in with dishes or coats feel natural, and our walking photo poses help them look relaxed. An instant camera on the table adds a fun extra; see our polaroid photo guide.
Use the main camera rather than the ultra-wide for faces, because the wide lens stretches people at the edges of the frame. Tap to focus on the nearest face, then lower exposure slightly so candle flames and white tablecloths keep their detail. Wipe the lens first; greasy fingers from dinner are the most common cause of hazy, glowing photos.
Flash or candlelight?
Candlelight gives the mood but needs steady hands, and moving people will blur. Flash freezes laughing faces and full glasses, with a bolder party look and darker backgrounds. Neither is wrong; many sets work best with both. Shoot the table and quiet moments by candlelight, then switch on flash for the toast and the group.
Flash makes blinks more likely, so take a few frames; our blink photo guide explains why. If you like the flash look but forgot to use it, the flash filter can add that style afterwards, and our G7X flash guide shows the compact-camera version.
Friendsgiving photo checklist
These five shots tell the story of the evening from start to finish. For a six-shot dinner list, add one bonus frame at the very end: the candles burning low once everyone has moved to the sofa. The same shot-list thinking works on holiday, as in our city break photo list.
- The table before anyone sits: shoot from the end, candles lit, chairs tucked in, everything still neat.
- Hands passing a dish: a close, slightly blurred moment of food moving between people. No faces needed.
- The toast: glasses raised, faces lit, ideally with a quick burst so at least one frame has open eyes.
- The group, before dessert: everyone still looks fresh, the table is not yet wrecked and nobody has left.
- The empty plates: crumbs, folded napkins and half-finished glasses, the quiet proof it was a good night.
Tidy the table before the group photo
Thirty seconds of tidying changes the group photo more than any edit. Move dirty plates and empty bottles out of the frame, pull phones and bags off the table, straighten the napkins nearest the camera and relight any candles that have gone out. Leave a few glasses and a dish or two so it still looks like dinner.
Ask everyone to lean in slightly and look at the camera, and keep the toast or dessert moment separate. If you missed the chance to tidy, our ChatGPT photo rescue prompts include a background clean-up prompt, though check edges and hands carefully.
Edits that keep it warm, not yellow
Start with white balance: cool the photo slightly until skin looks like skin, then stop before the candles lose their glow. Lower the highlights so flames keep their shape, and lift shadows only a little. Apply the same adjustment to every photo from the evening so the set feels consistent.
Avoid heavy smoothing, because candlelit skin has texture and that is part of the charm. Before saving any AI edit, run through our AI photo editing checklist.
A few useful answers
Why do my dinner photos look so yellow?+
Warm bulbs and candles push the color orange, and mixed lights confuse the phone. Turn off the overhead light, keep softer warm sources and cool the white balance slightly when editing.
Should I use flash at a dinner party?+
Use it for the toast and group photo, where freezing movement matters. Use candlelight for the table, details and quieter moments.
When is the best time for the group photo?+
Before dessert, when everyone is still there and the table is not yet cluttered. Take a few frames in a row so you have open eyes.